![]()
![]()
Instruction Manual
![]() Connect an AV receiver and/or a Blu-Ray disc player to your network environment.
Connect an AV receiver and/or a Blu-Ray disc player to your network environment.
![]() Connect an iPad to your WiFi network environment.
Connect an iPad to your WiFi network environment.
![]() Switch on the AV receiver and/or Blu-Ray disc player.
Switch on the AV receiver and/or Blu-Ray disc player.
![]() Start iControlAV2013.
Start iControlAV2013.
*You can connect up to four different iOS devices to the same AV receiver simulteneously .
If multiple users are controlling the same device simultaneously, the last operation will take effect.
*Blu-Ray Disc Players do not support control by multiple iOS devices simultaneously.
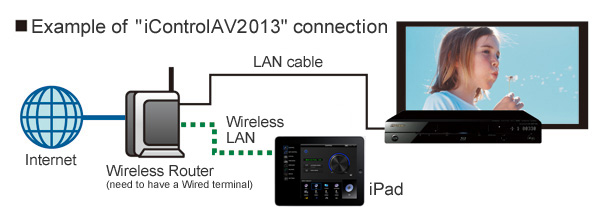
* This is an example in case of connection with an iControlAV2013-ready Pioneer Blu-ray Disc player.
You can connect with AV receiver in the same way.

You can access to the following page "CONTROL", "BDP CONTROL", "ECO MANAGER", "PUSH PLAYER", "STATUS VIEWER", "SOUND EXPLORER", "EMPHASIS", "BALANCE", "FINGER EQ", "MCACC", "SETTINGS" by tapping icons. *2
"CONTROL" <basic AV receiver functions control page>
1. "POWER"
You can switch on/off power of the AV receiver by tapping the button. *3
2. "ZONE"
You can choose one of "Zone" you want to control. *4
3. "Character display"
Same information as AV receiver FL display are shown in this area.
4. "LISTENING MODE"
"LISTENING MODE" page appears by tapping the button.
In this page, you can select the listening mode by tapping listening mode table.
* Some input positions does not allow you to select some of listening mode.
* If you set the "ECO MODE" on the ECO MANAGER page, you can change to the normal LISTENING MODE in this page.
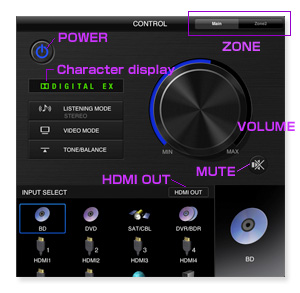
5. "VIDEO MODE"
"VIDEO MODE" page appears by tapping the button. In this page, you can adjust video parameters.
* Please refer to the AV receiver's owners' manual to learn the detail of video parameter adjustments.
6. "TONE/BALANCE"
You can control the level of "Bass" or "Treble".
In case Sub Zone is selected, you can adjust "Balance LR".
In case Main Zone is selected, the "BALANCE" page appears by tapping ![]() button.
button.
You can control the multi channel sound balance.
* You can not select "TONE/BALANCE"button, according to the selected LISTENING MODE.
7. "VOLUME"
You can adjust the AV receiver volume by dragging the "VOLUME" dial.
You can mute the sound by tapping ![]() button.
button.
8. "INPUT SELECT"
You can select the input function of the AV receiver by tapping one of icons.
9. "HDMI OUT"
You can select the "HDMI OUT" by tapping button.
* Due to HDMI standard specification, in case of using dual monitor output(the both of HDMI out1 and out2). The Video output resolution from AV receiver is suitable for the resolution of lower monitor.
Therefore, you need to change the video output setting according to the connected monitor's resolution.
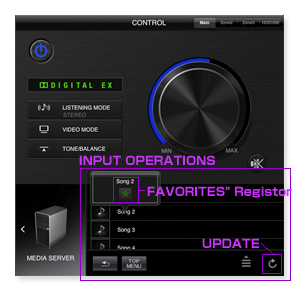
10. "INPUT OPERATIONS"
You can select the list of contents, radio station and play them about "INTERNET RADIO", "MEDIA SERVER", "FAVORITES", "iPod/USB".
* If you want to listen to Spotify on your Pioneer AV Receiver, you have to open the "Spotify App".
* Spotify function does not work in areas where the Spotify service is not available.
11. "FAVORITES"Registor button
You can register your favorite music and radio staion to the "FAVORITES" about "INTERNET RADIO", "MEDIA SERVER" by keeping touch the cell of them.
12. "UPDATE"
Tapping the button will update the display list.
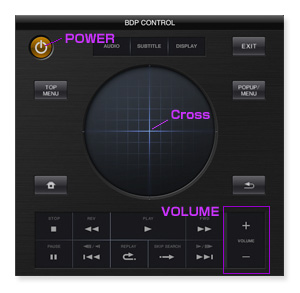
"BDP CONTROL" <basic Blu-Ray disc player functions control page >
* "AUDIO / SUBTITLE / DISPLAY"buttons are added to iControlAV2013.
1. "POWER"
You can switch on/off power of the Ble–ray disc player by tapping the button. *5
2. "Cross"
You can move cursor by flicking up/down/left/right. Tap action means "ENTER". *6
3. "VOLUME"
Volume +/- keys appear only if the iControlAV2013-ready AV receiver is connected to the network.
"ECO MANAGER" <Manges the AV Receiver' energy saving ECO modes>
1. "During Playback"
You can select the listening mode "ECO MODE1"or "ECO MODE2"to adjust settings for energy saving playback.
- "ECO MODE1" is effective for content played at higher volumes consistently. (i.e. Music playback)
- "ECO MODE2" is effective for sources with dynamic content. (i.e. Movies)
* Power consumption can be reduced more with "ECO MODE2" than "ECO MODE1".
* If another listening mode is selected on the LISTENING MODE page, ECO MODE will be turned off.
2. "At Stand-By"
Power consumption can be adjusted in 3 grouped settings:
"Maximum", "Middle" and "Minimum", where "Maximum" is the most aggressive in reducing power consumption.
The power consumption settings in "Maximum" and "Middle" are fixed. The settings in "Minimum" can be adjusted.
* In both "Maximum" or "Minimum with Network standby is OFF", in this case you can not turn on the AV receiver using iControlAV2013.
* When ARC is "OFF", the TV's audio may not be outputted from the AV receiver.
3. "When Not in Use"
You can set the amount of time before the AV receiver automatically turns off (when not receiving an audio or video signal).
4. For an explanation of "ECO MANAGER", tap the ![]() button.
button.
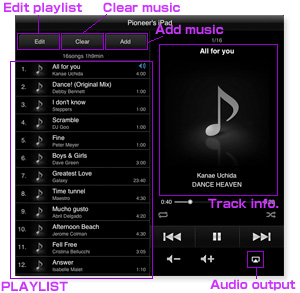
"PUSH PLAYER" <Playing music files stored in your iPad>
"PUSH PLAYER" allows you to access your iPad device's music library directly from iControlAV2013 to stream wirelessly to the AV receiver.
AirPlay is used to output audio to this unit.
* When multiple zones are connected, you can select the zone to play music to by accessing the "SETTINGS" menu.
* If a selected ZONE does not support the AirPlay, you can not select this.
1. "PLAYLIST"
Shows the list of tracks playing
* This playlist is made within iControlAV2013 and is different from the playlists found in the music library of your iPad.
* Editing this playlist will have no effect on the playlists in your iPad device's music library.
2. "Add music"
Tapping this button takes you to your iPad device's music library.
From this screen, you can select tracks you wish to add to the iControlAV2013 playlist.
press ![]() , and "END" to add a particular track.
, and "END" to add a particular track.
* You can also add multiple tracks at one time, or add tracks in units of entire albums or artists.
3. "Edit playlist"
You can rearrange the order of tracks or remove them from the playlist.
4. "Clear music"
Removes all tracks from the iControlAV2013 playlist
* But, has no effect on the playlists found in the music library of your iPad.
5. "Track info."
Displays information about the current track.
6. "Audio output"
Tap this button to display a list of currently connected AirPlay devices
Select ayour AV reciever from the Audio output list and music will play to it.
* If no connected AirPlay devices are found, the ![]() will not appear.
will not appear.
* The Audio output screen will display all devices compatible with AirPlay in your network environment.
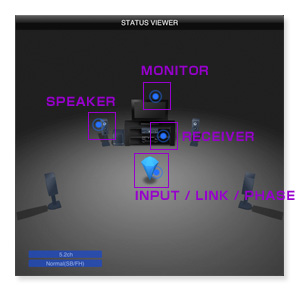
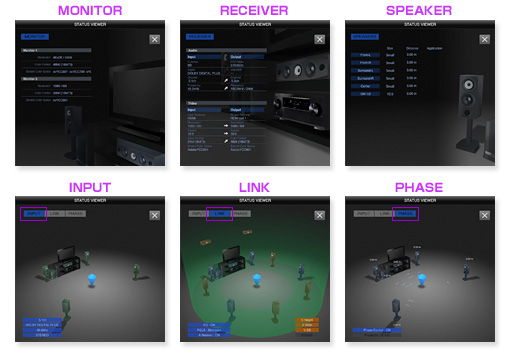
"STATUS VIEWER" <Shows your home theater's real-time status>
"STATUS VIEWER" gives you a real-time look at your home theater environment and the speakers and components you have connected.
Speakers that are connected to the AV receiver are indicated.
Speakers currently outputing audio are blinking.
Yellow speaker means "Virtual speaker". Red speaker means "Bi-AMP connection".
You can see additional detail for each component by tapping its corresponding ![]() button.
button.
1. "MONITOR"
You can check a connected Monitor or Television's current status.
2. "RECEIVER"
You can check the AV receiver's actual input and output signal information.
3. "SPEAKER"
You can check the status of speakers connected to the AV receiver.
4. "INPUT"
You can check the INPUT signal information of your AV receiver.
5. "LINK"
You can check the actual playing signal information and sound field image of your AV receiver.
6. "PHASE"
You can check the status of revised Phase by your AV receiver.
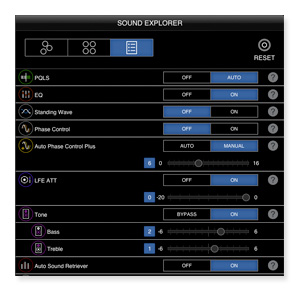
"SOUND EXPLORER"
Here you can set the sound field adjustment function for the AV receiver. *7
1. "Setting parameters for each individual function"
You can adjust the settings of each function by tapping its circle icon.
When tapped, the icon is highlighted, and the current settings are displayed.
Settings can now be changed.
2. "Function Explanation"
When you push ![]() button that is appears when an icon has been selected, an easy explanation of the function is displayed.
button that is appears when an icon has been selected, an easy explanation of the function is displayed.
When an ![]() button is displayed on the function explanation page, hitting that button allows you to watch an explanation movie about that function.*8
button is displayed on the function explanation page, hitting that button allows you to watch an explanation movie about that function.*8
3. "Operation mode"
You can select the operation mode.
The drop icon mode - circle function icons fall from the top - is activated by tapping ![]() button.
button.
The fixed icon position mode is selected by tapping ![]() button.
button.
The list mode - all functions and their settings are listed - appears by tapping ![]() button.
button.
4. "UNDO"/"REDO"
After making a change, tapping the ![]() button will revert the changes just made back to the original settings.
button will revert the changes just made back to the original settings.
You can redo the setting changes canceled with ![]() button again by tapping
button again by tapping ![]() button.
button.
5. "RESET"
When you select "Return to the previous status", all settings are returned to the state before "SOUND EXPLORER" mode was started.
When you select "Reset to factory defaults", all settings in "SOUND EXPLORER" are returned to the factory default settings. *9

"EMPHASIS"
1. "Bass"
Bass page appears by tapping "Bass" button. You can control the sound level from subwoofer speaker. Bass level is defeated by dragging towards the center of the display, or sound level is boosted by dragging towards the edge of the display. When the "Bass" button is tapped, the screen switches to the subwoofer volume level control screen. The volume level decreases when dragged towards the center of the screen, increases when dragged towards the outside.
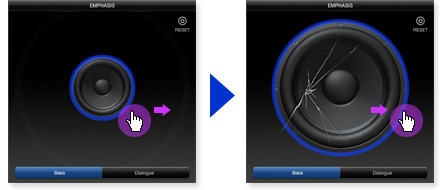
2. "Dialogue"
Dialogue page appears by tapping "Dialogue" button. You can control the center speaker sound level. Sound level is defeated by dragging towards the center of the display, or sound level is boosted by dragging towards the edge of the display.
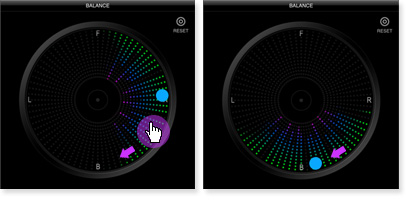
"BALANCE"
Drag the ball in the direction in which you want to increase the level ("F", "B", "L" or "R").
Drag the blue ball in the desired position, to fix the balance of the audio in your home theater
* When the receiver is turned off or put in standby, the iControlAV2013's Balance settings are reset.
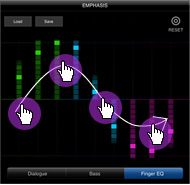
"FINGER EQ"
"Finger EQ" When the "Finger EQ" button is tapped, the screen switches to the frequency response adjustment screen for the contents you are currently listening to.
This adjustment is performed for all channels simultaneously.
The frequency response can be adjusted by dragging on the screen to draw a line.
One set of adjusted values can be saved by tapping the "Save" button after adjusting.
After saving, the saved adjustment values can be set by tapping the "Load" button.
* When the receiver is turned off or put in standby, the iControlAV2013's Finger EQ settings are reset.
"MCACC"
1. Switching the display items
The graph of the selected item or a list of MCACC parameters is displayed.
Reverb: How the sound reverberates in the listening environment
Group Delay: Phase disturbance for the overall band
Parameter: Measurement data
2. ZOOM slider
Enlarges and reduces the graph.
3. Operation switch
Selects the operation when the graph is touched.
4. Legend
Indicates which colors on the graph correspond to which channels/frequencies. When the speaker group delay characteristics graph is displayed, the channels below are displayed (maximum).
F: Front, FH: Front height or FW: Front wide, C: Center,
S: Surround, SB: Surround back
5. All/individual display switch
Specify the graph(s) to be displayed by selecting all (ALL) or individual graphs (Left, Center, etc.).
6. Channel/Frequency switches
Channel: Display mode for specifying the channel. (The frequencies are displayed on the graph's depth axis.)
Frequency: Display mode for specifying the frequency. (The channels are displayed on the graph's depth axis.)
7. Before calibration/After calibration switches
The response graph before calibration is displayed when "Before" is selected, the response graph after calibration when "After" is selected.
8. Reverberation characteristics graph display type switches
Each:
All channels are displayed, each individually. The each channel display is set when equalization is performed with [ALL CH ADJUST].
Pair:
The reverberation characteristics are displayed, combining the left and right pairs of the front, surround and surround
back channels.
The pair channel display is set when equalization is performed with [SYMMETRY] or [FRONT ALIGN].
9. 2D/3D display switches
These select whether to display the graph in 2D or 3D.
10. Band graph/Bar graph display switch
Sets the display to a band graph or bar graph.
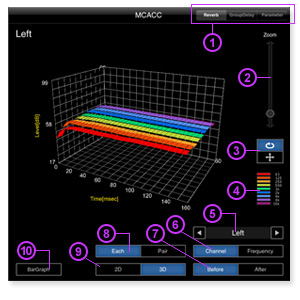
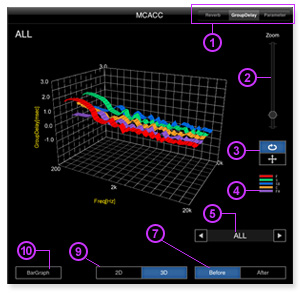
For instructions on reading the graphs, see the "Advanced MCACC PC Display Application Software" operating instructions in the included AVNavigator software.
"SETTINGS"
1. "Select Product"
When you want to add a device to be operated, if the device to be controlled could not be connected to when iControlAV2013 was launched, you can search for the device to be controlled and connect to it at this screen.
1-1."ON/OFF"button
Set devices you want to connect (operate) to "ON", devices you do not want to connect (operate) to "OFF".
For example, if you only want to connect an AV receiver, set "AV Amp" to "ON", "Blu-ray Player" to "OFF".
1-2."UPDATE"button
When the "UPDATE" button is tapped, controllable devices in your network environment are searched for, and when controllable devices are found, their model names are displayed. Tap the model name to which you want to connect.
1-3."IP ADDRESS"
Connecting is possible not only by scanning with the "UPDATE" button, but also by inputting the IP address of the device to be controlled.
When "IP ADDRESS" is tapped, the screen switches to the IP address input screen. Input the IP address of the device you want to operate, then tap the "SEARCH" button.
* For instructions on checking the IP address of devices to be controlled, see the device's operating instructions.
2. "OPERATION MODE" *10
AV receivers offer a wide variety of functions and settings, but this setting for switching the operation mode is provided for users who feel it is difficult to master all these functions and settings.
One of two operation mode settings can be selected: Expert and Basic.
* Expert: Users can set all the functions by themselves.
* Basic: The operable functions are limited, and the functions whose operations are limited are automatically set to Pioneer-recommended sound and picture qualities.
3. "Play ZONE Setup" *10
Select the ZONE to play music to via AirPlay or DMR.
4. "DEMO MODE"
This switches the demo mode on and off.
When the demo mode is set, iControlAV2013 can be operated without connecting to controllable devices.
Use this to check what operation screens are provided.
5. "INPUT EDIT" *10
This can be used for rearranging the input functions, turning displays on and off and renaming.
The input name can be changed by tapping the "Rename" button then tapping the icon whose input name you want to change.
After changing the input name, tap the "Done" button.
This setting is reflected at "INPUT SELECT" on the "CONTROL" screen and on the AV receiver.
Drag and drop the icon you want to reposition to the desired position.
The icon is replaced with the icon at that position. It is also possible to tap the check mark in the check box on the "INPUT" screen at the right edge of the screen to remove the check mark and delete the icon from "INPUT SELECT".
If you want to display the icon again, tap its check box.
This setting is reflected at "INPUT SELECT" on the "CONTROL" screen.
* This setting is not reflected on the AV receiver.
6. "VERSION INFORMATION"
This displays the iControlAV2013's version information.
(*1) This screen is only displayed when "iControlAV2013" is launched.
(*2) When only an AV receiver is connected, the BDP CONTROL icon is not displayed.
When only a Blu-ray player is connected, the "CONTROL", "ECO MANAGER", "PUSH PLAYER", "STATUS VIEWER", "SOUND EXPLORER", "EMPHASIS", "BALANCE", and "MCACC" icons are not displayed.
(*3) The power can only be turned on when your PIONEER AV receiver's network standby function is turned on.
(*4) The number of zones that can be controlled depends on the model. For details, refer to your AV receiver's operating instructions.
(*5) The power can only be turned on when the Blu-ray disc player's "Quick Start" function is turned on.
NOTE: You can not power on with iControlAV2013, if your Blu-ray Disc player does not have "Quick-Start" function.
(*6) Not all functions of Blu-ray disc players are guaranteed to be usable.
(*7) The parameter(s) that can be set are different depending on your AV receiver model.
(*8) Your iPhone/iPod touch must be connected to the internet to see the movies.
(*9) The settings other than the sound field adjustment function in "SOUND EXPLORER" are not reset.
(*10) This is only displayed when an AV receiver is connected.
Frequently Asked Questions (FAQ)
Q1.What devices are supported by the iControlAV2013?
A1. Please see the list of supported devices on the App Store or iControlAV2013 introduction page.Q2.Can other AV devices be operated with the application?
A2. AV devices other than supported AV receivers and Blu-ray Disc players cannot be operated.Q3.Can iControlAV2013 be used with the last year's Pioneer AV receiver?
A3.The iControlAV series is developed by the best specification for each generation's AV receiver. This App doesn't support to the operation with the past model. The last year's AV receiver works with iControlAV2012. Please see the list of supported devices on the App Store or iControlAV2013 introduction page.. As for Blu-ray Disc Player, iControlAV2013 supports the past models.Q4.What preparations have to be made to use the application?
A4.Connect the supported AV receiver or Blu-ray Disc player by Ethernet to your home's wireless LAN router equipped with a wired LAN connector.(For a connections diagram, see "Before you start" in [Instruction Manual] above.)
Q5.What operating environment is required?
A5.The application can be used on an iPhone, iPod touch or iPad with iOS5.1 or later.Q6.Does iControlAV2013 support the Retina display?
A6.iControlAV2013's screen realize the suitable display for the Retina display.Q7.I'm having problems downloading the application.
A7.Do you have a log in ID for the App Store (iTunes Store)?Depending on the WiFi connection's communications quality and the Internet connection's status, it may be difficult to download the application. In this case, wait awhile and try downloading again.
Q8.I have downloaded the application and prepared the environment, but I'm having trouble connecting and an error message is displayed.
A8.See Troubleshooting below.Q9.As for 4 devices connection simultaneously, Can I operate it with which devices?
A9.It is possible to connect with all devices that can work with iControlAV2013.Q10.The operation response sometimes becomes the slow, when the plural devices are connected simultaneously?
A10.It is not a breakdown though the movement of some functions might become slow.Q11.Can music files on an iPhone/iPod touch/iPad be played from the application?
A11.(For iPhone/iPod touch) iControlAV2013 can play the strored music by tapping button of "INPUT SELECT" page.
(For iPad) iControlAV2013 can play the stored music by tapping
"PUSH PLAYER" of MENU Area.After playback, then select your AV reeiver by tapping
 button.
In case of Blu-ray disc player, the stored music in your iPhone/iPod touch/iPad can not be played,
Q12. I want to enjoy the stored music in my iPhone/iPod touch/iPad by "PUSH PLAYER" in my ZONE2 room.
A12.You can change Main to Zone2 by "PLAYZone" setting at "SETTINGS" page(HOME MENU).Q13.Is it possible to play the stored music of NAS by "PUSH PLAYER"?
A13."PUSH PLAYER" is used when playing music files stored in your iPad/iPhone/iPod touch. As for the music file stored in your NAS, You can operate and play by "MEDIA SERVER" of INPUT SELECT page.Q14.The playing music might become interrupted while adding/editing the playlist with "PUSH PLAYER".
A14.It is not defect influenced internal processing of iControlAV2013.Q15.With my AV receiver I can't turn on the power from the application. Why is this?
A15.Turn the AV receiver's "Network Standby" function : ON. (Please refer for the below setting part,"ECO MANEGER" setting ⇒ "At Stand-By" item ⇒ Minimum or Middle.)
For details, refer to your AV receiver's operating instructions.
Q16.I can not change the ZONE.
A16.You can change the "ZONE" at HOME MENU only (in case of iPhone/iPod touch), CONTROL page only (in case of iPad).Q17.I can find "ZONE3" at the HOME MENU.
A17.The number of supported zones differs according to the AV receiver.Q18.After change the selected "ZONE", the some features will be not appered.
A18.Depending on the current selected ZONE, it may not be possible to use some features.Q19.I changed the settings in the demo mode, but when I checked later the settings had not been changed.
A19.Settings made in the demo mode are not saved.Q20.Settings adjusted at "EMPHASIS", "BALANCE" and "FINGER EQ" are cleared.
A20.The application is designed so that the settings adjusted at "EMPHASIS", "BALANCE" and "FINGER EQ" are cleared when the AV receiver's power is turned off.Only for the "FINGER EQ", it can save the one setting in the iControlAV2013. You will be able to load it anytime.
Q21.I have been using iControlAV2013 with an AV receiver and have recently purchased a Blu-ray Disc player as well. How can I connect it?
A21.Turn the Blu-ray Disc player on at Settings -> Select Devices.Q22.I have been using iControlAV2013 with a Blu-ray Disc player and have recently purchased an AV receiver as well. How can I connect it?
A22.Turn the AV receiver on at Settings -> Select Devices.Q23.I have been using iControlAV, iControlAV2 or iControlAV2012 with a Blu-ray Disc player and have recently purchased an AV receiver that is iControlAV2013-ready as well. How can I connect it?
A23.Delete iControlAV, iControlAV2 or iControlAV2012, and after that download iControlAV2013 into your iPhone, iPod touch or iPad.Q24.How many control devices (Blu-ray Disc players and AV receivers) can be recognized?
A24.All devices on the network can be recognized, but only one Blu-ray Disc player and one AV receiver each can be controlled.If multiple units are recognized, the device to be controlled must be selected in iControlAV2013.
Q25.Some functions do not appear with "SOUND EXPLORER".
A25.Only the functions that are supported by the AV receiver being controlled will appear. For AV receivers supporting this, you first need to do a Full-Auto MCACC (automatic sound field tuning) once on the AV receiver itself before using the related function here.Q26.A value that was set previously is displayed when I call out the manual IP settings screen. What should I do?
A26.To connect to a device that has a different IP address using the manual IP function, overwrite the IP address.Q27.I cannot select some HDMI functions on the page of "INPUT SELECT".
A27.The HDMI input is assigned as input terminal of another function. It becomes available if the assignment is released via the AV receiver's "Home Menu" and the HDMI input is set as an independent input.Q28.TV Audio does not output from my AV receiver.
A28.It might be not output the TV Audio output, if you set the "Control:OFF" or "ARC:OFF" at "At Stand-by" item of ECO MANAGER.Q29.Why can't I download the "Spotify application for smartphone".
A29.Spotify can only be accessed in countries where it is officially available.Q30.The graph does not display when I start MCACC.
A30.You need to do a Full-Auto MCACC (automatic sound field tuning) once on the AV receiver itself.Q31."Group Delay" is not displayed in the MCACC items.
A31."Group Delay" is only displayed for products supporting the group delay function.Troubleshooting
- Does your iPhone/iPod touch/iPad connect to your network via WiFi? Once a WiFi connection is engaged, a WiFi icon Does your iPhone/iPod touch/iPad connect to your network via WiFi?
Once a WiFi connection is engaged, a WiFi icon appears on the upper left corner of your iPhone/iPod touch/iPad screen.
![]()
- Does your AV receiver and/or Blu-ray disc player connect to your network?
Please connect it/them to the same network as your iPhone/iPod touch/iPad are connected.
(Please connect your AV receiver and/or Blu-ray disc player to your network access point)
![]()
- Is your AV receiver and/or Blu-ray disc player turned on?
If your AV receiver's Network Standby is set to ON (In the case of a Blu-ray disc player, Quick Start is ON), you can use iControlAV2013 to control your AV receiver and/or Blu-ray disc player when they are in standby mode.
![]()
- "Did you already connect iControlAV2013 to Blu-ray Disc player from another iPhone/iPod touch/iPad/Android?
If so, you cannot connect multiple iPhone/iPod touch/iPad/Android to Blu-ray Disc player at the same time.
![]()
- During the iControlAV2013 starting process, did you change the IP adress of the AV receiver and/or Blu-ray Disc player manually?
If so, exit iControlAV2013 and restart the application.
![]()
- Is your AV receiver and/or Blu-ray Disc player compatible with iControlAV2013?
Please refer to the list of compatible models for iControlAV2013 on the introduction page of the app.
![]()
- Does your Blu-ray disc player connect to the internet?
If you don't connect your Blu-ray disc player to the internet, its network set-up is not yet completed.
For Introduction Features and Download (iControlAV2013 Application Support & Guide Top page), click here
Apple, AirPlay, iPad, iPhone, iPod touch and iTunes are trademarks of Apple Inc., registered in the U.S. and other countries.
iOS is a trademark on which Cisco holds the trademark right in the US and certain other countries.